Work in Record View
Record View is the another component of the documents pane. It is visible only when the Record View option is selected and it presents the field content for a single record in a “coding form.” Coding forms are specific sets of fields configured by your administrator for specific review/field editing purposes. Coding forms control the fields that appear in the case table and in Record View.

|
Note: Access to Record View, specific coding forms, and/or fields is governed by various privileges and settings. Contact your administrator if you have questions about working in Record View or specific coding forms. |
This topic covers work that you perform in Record View, such as opening native files, changing displayed fields, and editing field data. Click on the links below to view procedures associated with these tasks.
 Open a Native File from Record View
If your case includes native files and you have the applications needed to open these files, you can open them from Record View (in addition to Case View, etc. tabs).
To open a native file from Record View:
-
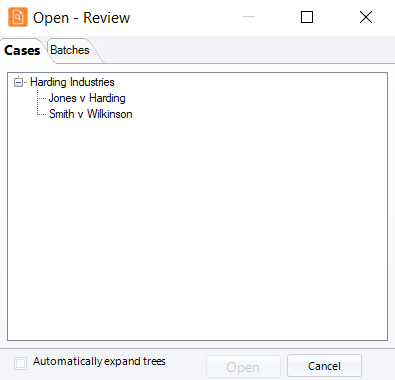
On the Dashboard, click the Review module.

-
Select a Client and Case and click Open.
-
Make sure Record View is visible. To switch to Record View:
-
On the menu bar above the Case View tab, select the Record View option and needed coding form.
Click
for an example.
-
Take any of the following actions to view needed data:
-
Change the Record View size or orientation, or make it freestanding (undock it).
-
Scroll to see all fields.
-
For fields with more than one line of data, click Expand corresponding to the field to see all field content.
-
Change the font size to meet your needs.
-
-
Familiarize yourself with the Record View toolbar and keyboard shortcuts.
(If you have the privilege to modify the case table, the “0” layout will be User Defined Layout.)
-
-
If you are not in edit mode, click the Edit button,
 .
. -
On the Record View toolbar, click
 . The file will open in its native application.

Change the Fields Displayed in Record View
If you have the needed privilege, you can change which fields display in Record View for either the Default Layout or the User Defined Layout. (This name varies based on your ability to edit the case table.) Changes in Record View are independent of changes you might make in the case table.
To change the fields displayed in Record View::
-
On the Dashboard, click the Review module.
-
Select a Client and Case and click Open.
-
Make sure Record View is visible. To switch to Record View, on the menu bar above the Case View tab, select the Record View option and needed coding form.
- Right-click in a field and select Edit display fields.
- Optional: add
fields to Record View:
- To select all fields (except the EXTRACTEDTEXT field), click Select All in the Available Fields area.
To select an individual field, locate it in the Available Fields list and click directly on its check box,
 . The field moves to the
Displayed Fields list.
. The field moves to the
Displayed Fields list.
Repeat the previous step for other fields you want to show.
-
Optional: To remove fields from Record View:
-
To select all fields, click Select All in the Displayed Fields area, then select one field to display (one field must display).
-
To select an individual field, locate it in the Displayed Fields list and click directly on its check box. The field moves to the Available Fields list.
Repeat the previous step for other fields you want to hide.
-
-
To rearrange the order of fields in Record View:
- Evaluate the order of fields in the Displayed Fields list.
- Click the name of a field to be moved (not the check box). The field name highlights.
-
Drag the selected field name to the needed position (or use the Up/Down buttons).
Repeat these steps to move other fields.
-
When finished, click Apply.
The changes are applied to Record View and will remain in effect for the current and future working sessions (until you make other changes or select a pre-defined coding form).
Edit Field Data in Record View
When in record view, you can edit filed data in one of two ways. you can:
- Copy Field Data from One Record to Another
- Edit Fields Manually
See the sections below for specific instructions on how to edit field data. For information about limitations to editing, see Editing Limitations.
|
|
Note:
|
Copy Field Data from One Record to Another
To copy/paste data for one or more fields from one record to another:
-
On the Dashboard, click the Review module.
-
Select a Client and Case and click Open.
-
Make sure Record View is visible. To switch to Record View, on the menu bar above the Case View tab, select the Record View option and needed coding form.
-
On the Record View toolbar, click
. -
To save changes automatically, select the Auto Save Changes option.
-
Complete one of the following steps, depending on how you want to copy/paste data.
-
Toolbar: to copy/paste data using the Record View toolbar:
-
Select the field data to be copied, then click
 .
. -
In the current or another record, click (or select data) in the field into which copied data should be pasted and click
 . The field
must be a similar type, for example, do not paste text into a DATE
field.
. The field
must be a similar type, for example, do not paste text into a DATE
field. -
Make other changes and/or save the record.
-
-
Previously edited record - single field: To copy data for a single field from a previously edited record:
-
Edit a record and save changes (either through Auto Save or by clicking
 ).
For example, edit a field(s) in record ABC-001.
).
For example, edit a field(s) in record ABC-001. -
Select the next record to be edited. For example, ABC-002.
-
Right-click in the field to be changed and select Copy field from previous record. For example, select this command in the Comments field of ABC-002. Comments from ABC-001 will be pasted into the Comments field of ABC-002.
NOTE: The field into which data is being pasted may or may not have been edited in the previous record.
-
-
Previously edited record - edited fields:
To copy data from all edited fields from a previously edited record:
-
Edit a record and save changes (either through Auto Save or by clicking
).
For example, ABC-003. -
Select the next record to be edited. For example, ABC-004.
-
Right-click in any field and select Copy all edited fields from previous record. Data from previously edited fields will be pasted into the same fields in the currently selected record. For example, if you edited three fields in ABC-003, data from those fields will be pasted into the same fields in ABC-004.
-
-
Edit other fields using this procedure or manually as described next.
-
When finished, if you are not using Auto Save, click
.
Edit fields Manually
To edit fields manually:
-
On the Dashboard, click the Review module.
-
Select a Client and Case and click Open.
-
Make sure Record View is visible. To switch to Record View, on the menu bar above the Case View tab, select the Record View option and needed coding form.

-
On the Record View toolbar, click
. -
To save changes automatically, select the Auto Save Changes option.
-
Make changes for different field types as described in the following steps.
-
Category fields: if a field is of the CATEGORY type and includes a control list, select the needed value from the drop-down list.
-
Text fields: If a field is a text-based field and field content is truncated, click Expand to make it editable. Click in the field and make required changes. Use the toolbar as needed.

Tip: If a field has been configured with the spell-check option, words not recognized by the spell checker will be underlined in red.
To correct misspelled words:
-
Click in the word, right-click and select Spell Check Suggestions.
-
In the suggested spellings list, click the correct term. Or, if the correct spelling is not listed, exit the list and make corrections as needed.
-
-
-
Date fields: Check with your administrator regarding requirements for date fields; enter or correct dates as instructed. You can vary from the format somewhat, such as omitting leading zeroes (for months or days), or the first two digits of the year, or using slashes instead of dashes. Review will correct your entry to match the case format. However, note the following:
-
To enter dates without delimiters, use the yyyymmdd format. For example, 20110309 is March 9, 2011.
-
To enter dates with delimiters, use any delimiter and the date format defined for your case. Check with your administrator for the date format (mmddyyyy, ddmmyyyy, etc.) For example, 03-09-2011.
-
If the full date format is being used in your case (such as “March 9, 2014”), enter the full format or the mm-dd-yyyy format (with any delimiter). For example, 03/09/2011.
-
Date ranges defined for coding forms are not enforced when you edit date fields in the case table.
-
Partial dates may not be allowed. For example, if the date format is mm-dd-yyyy and partial dates are not allowed, entering only the month and year will be considered invalid. Likewise, if a DATE_TIME field does not include a time, it will be considered invalid.
Note: Your administrator may have configured Review to fill empty or partial dates with zeroes or nines. These can serve as a visual cue for missing or partial dates.
-
-
Pick or name lists: Given the appropriate privileges, you can edit Pick Lists and Named Lists. See Edit Pick or Name Lists in Record View.
-
When finished, if you are not using Auto Save, click
.
|
|
TIP: If your administrator has configured shortcut keys for the coding form you are using, use the shortcut keys to navigate from one field to another. These shortcuts are comprised of the Alt key and a number or letter assigned by your administrator. Shortcut keys work when the coding form is enabled for editing and you have clicked in a field. |
Editing Limitations
Your ability to edit fields is determined by the privileges assigned to you.The following situations may impact your ability/right to edit various fields:
-
If your administrator sets view-only security for a field that is in a coding form, you will be able to view the field content but not edit it (in Record View or the case table). Fields with this setting are indicated by a lighter gray in coding forms; in the figure on the previous page, the BEGDOC field is view-only.
-
It is also possible that a field you are instructed to edit is not visible in the case; change the fields visible in Record View and/or the case table and then edit it.
-
Rules may be defined for coding forms requiring specific actions be taken regarding field editing and/or tagging. Unless rules are met, you cannot save changes. Messages in the status bar will alert you to rule violations.
-
If a change is made that conflicts with unique or defined information (for example, changing the value of a primary field to one that already exists), the change will not be saved. In this event, an error message will display. (A primary field has unique values.)
-
The following field types are automatically populated. Manual edits are allowed, but certain actions will cause edits to be overwritten (for example, if the Case Data Summary Report is run in Administration). Check with your administrator before editing these fields:
-
BEGATTACH
-
ENDATTACH
-
FILE_EXT
-
FILE_ID
-
NATIVE_SIZE
-
IMAGECNT
-
TEXT_SIZE
-
Contact your administrator if you have questions about the fields in your database and the ones that you can/should edit.
Related Topics
Keyboard Shortcuts: Record View
Edit Pick or Name Lists in Record View
Version: 2023.8.12
Last Revision: 11/8/2023